


The plastic opening tool may break during this step. You may need to use the heavy duty spudger instead.
Insert the plastic opening tool between the glass screen and the back cover so the curved end of the plastic opening tool is under the glass. Gently pry the back cover away from the glass screen.
Continue inserting the plastic opening tool around the whole device screen to completely separate the back cover from the glass screen.

Gently lift the screen up with your finger.

Using your fingers, remove the green tape covering the battery connector.

Insert the flat end of the heavy-duty spudger between the wires and underneath the battery connector. Carefully lift the black battery connector up to disconnect it from the motherboard.
The metal spudger shown in the photo is not recommended due to the possibility of an electrical short. Use an ESD-safe tool, such as a heavy-duty (nylon) spudger.
Gently lift the camera from its socket with the flat end of the heavy-duty spudger.

Gently lift the gold cable connector with the flat end of the heavy-duty spudger to disconnect it from the device.

The charging port cable is the black cable connected to the charger port. Using your fingers, peel the green tape off of the charging port cable connector.

Using the flat end of heavy-duty spudger, carefully lift the black tab that holds the charger port cable in place.
Slide the cable out.
There is a small strip of adhesive holding the charger port cable to the battery. You may need to slide the heavy-duty spudger between the cable and the battery to slide the cable out.
There is a small strip of adhesive holding the charger port cable to the battery. You may need to slide the heavy-duty spudger between the cable and the battery to slide the cable out.

Use the Phillips 000 screwdriver to unscrew the two 3mm screws holding the charger port in place.

Use the flat end of the heavy-duty spudger to lift the white microphone piece until it is removed from itssocket.

Be sure to insert the spudger underneath the charger port and not inside the charger port to avoid damaging the component
Slide the flat end of the heavy-duty spudger under the charger port.
Make sure the spudger is all the way to the back of the cavity and slide horizontally across the bottom to break the adhesive.
Make sure the spudger is all the way to the back of the cavity and slide horizontally across the bottom to break the adhesive.

Lift the charger port with the flat end of the heavy-duty spudger and remove it from the device.

Using your fingers, remove the green tape holding the three ribbon cables down.
Using the flat end of the heavy-duty spudger, carefully lift the black tab that holds the leftmost, black ribbon cable in place. Repeat this step for the gold ribbon cable and the black ribbon cable.
Using your fingers, gently slide each of the three cables straight out of the connectors.
Using your fingers, gently slide each of the three cables straight out of the connectors.

Using a Phillips #000 screwdriver, remove the ten 3mm screws that hold the battery down.

Lift the battery with your hands and remove it from the device.

Using the flat end of the heavy-duty spudger, lift up the black ribbon lock directly left of the headphone jack from the black side.
After lifting up the lock, insert the heavy-duty spudger underneath the gold ribbon and slide to disconnect the gold ribbon.

The rear camera may pop out.
Using the flat end of the heavy-duty spudger, gently lift up the ribbon lock directly above the one in the previous step from the brown side.
After lifting up the lock, remove the gold ribbon with the heavy-duty spudger as you did in the previous step.
After lifting up the lock, remove the gold ribbon with the heavy-duty spudger as you did in the previous step.

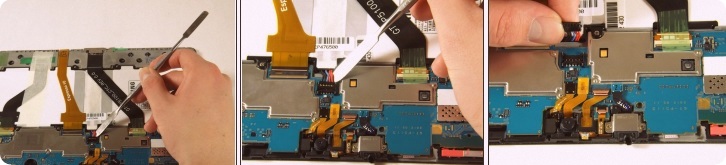
Use the flat end of the heavy-duty spudger to pop off and disconnect all the marked connectors attached to the motherboard.

After disconnecting all of the connectors, push up on the motherboard with your thumbs to dislodge it from the tabs fastening the bottom of the motherboard. Then lift up the motherboard tocarefully remove it from the device.
You may need to repeat this step a few times. The motherboard can be difficult to remove.


Không có nhận xét nào:
Đăng nhận xét